28 December 2010

Cabinet Progress


Cabinets are all in with a few minor adjustments to be made.  The wood we are using is knotty maple.  The stain will be selected next week then the cabinet-tops will be installed.


From left section to right, the space next to the drawers is for a wine refrigerator.  The cabinets above will have seeded glass in them.  The next section with the tall doors is the baking center.  Think of it as a mutant appliance garage that will hold any and all things baking.  The cabinets below will pull out to hold bins of flour, sugar, etc. 

The two alcoves right of the baking center are for the ovens.  The cabinet below one will be slotted for sheets and pans and the next cabinet will be more storage for different cake pans and such.


 Inside the baking center.  The cabinet top will be granite and it is lowered to 30" so that it is more comfortable for me to knead bread.  The shelves are U-shaped and will hold all of my baking stuff.


This is the slotted cabinet underneath one of the ovens and will hold baking sheets and trays.


Here is where I will stand at the sink and watch neighborhood children ride by on their horses while I wash dishes.  From right to left, the first section will be for dishes; then drawers, dishwasher, primary sink, dishwasher, and more drawers.  At the end of the cabinet top, near the pantry door is a little cubby I designed to hide C's cappuccino machine and my coffee maker mess. 


The island.  12' long x 4' deep, it was scaled down from 12' x 6'.  Once I started measuring out an imaginary island on the floor I realized how big the 12' x 6' really was.  So it got cut down to 12' x 5' which didn't seem so bad.  Then, one night at a cooking class I was working at a 5' x 7' island and realized how much space in the middle of the island was not reachable by me and probably wasted space.  Sometimes bigger is not better.  Besides, when I cut it from 5' deep to 4' deep it really knocked the price down; and that I can certainly live with!


This is at one end of the island looking down in the area where the sink will be mounted.  They had the island placed a little too closed to the range top so I had them move it back some, thus the extra piece of wood they had to cut and will fit back on there.

This is where the telly and stereo, etc. will all go. 


Whoopsy!  A little mistake in the height of the center vanity!  That's going to come down to 30". 

The next time we take a look at the cabinetry, it will be in the staining stage.

13 December 2010

Cabinetry

Christmas in Texas, yall !!
I think I'm going to enjoy living out in the country.....

because you just won't see this in Highland Park.

I wish I could have gotten a closer shot, but I was taking it through their fence.  Ride 'em Santa!

OK, Cabinets are going in!!!

 I sort of freaked when I saw a portion of this.  The group of cabinets to the left of the oven openings are supposed to be a lot lower (32" from the floor).  Actually, the same height as the bottom of the ovens. 
 Notice that the top of the Baking Center cabinets are higher than the other cabinets??  I found out that the cabinet installer installed the cabinets higher on purpose while other cabinets were installed; so, all is well in cabinet world.  I am going to really enjoy the height of the ovens!

 Refrigerators are on both sides of the range top.
Cabinets in the utility room

 Mud room drawers

 The kitchen is starting to take form.  Geez, I can't wait for the island to be put in.
These drawers look odd because they are very shallow.  These drawers will be used for knife storage.


10 December 2010

Flooring

Right up front I'll warn you this is just a bunch of photos taken of the floors.  Nothing special but I am very pleased with my husband's selections.  We did decide on a variety of surfaces; hard wood, travertine, marble, tile, stained concrete.  Here...take a look...

Wood

Staining will be one of the last things they do.  We (read husband) haven't decided on the color yet.

 The kitchen (cabinets in this weekend!).  Off subject, but see the piece of duct work in the middle of the kitchen wall that was installed for the vent hood?  That's become the big elephant in the room, but I'll explain that in another post.  There is hard wood in the pantry as well, which is through the doorway on the right.


Travertine

 The entry hall looking back at the front door.

 We had it set in a pattern called Versailles

 We carried the travertine down the entry hall, into the powder room


And into the master bedroom


Tile

This tile was selected for the hall from the garage into the mud room and on into the utility room.  I apologize, I'm obsessed with ballet positions.  My first position lacks a tad bit of an angle.


 Third position.  What's that you say?  Oh, yes I remember.  We're supposed to be talking about tile.

This is the guest Jack and Jill bathroom.  I think this is the neatest stuff!  It's tile, but looks like boards off the side of an old weathered barn.  Kind of funky, huh?

The whole bathroom is tiled in this.  I was just fixated on the shower this day for some reason.

Marble

 This is Emperador Dark.  C chose this for the master bath because he likes everything to look slick and shiny in the bathroom.  It's really pretty though.


 A little side room into the shower, also known as, somewhere to throw the towels so they don't get wet


Sorry for all the bright spots where the flash hits the wall.  Slick and shiny!  Notice that David the tile man cut the tiles into 6 inch squares for the shower floor.  That's so there is more grout which makes it less slick.


And, lastly the loo; or will be when we get the pot installed!

I don't know about you but my neck hurts looking down at the floor so much!

The guest bedrooms will be stained concrete so I'll share that when it gets done.  I'm not really familiar with stained concrete so it will be something new and I hope I can go out to the house and watch them do it.  It might be as exciting as watching paint dry.

09 December 2010

The Woods

I've had this week off from work to get all of my Christmas baking done.  To prevent myself from feeling like a total sugar ball, I took a break from the kitchen one morning this week to go out to the house.  Things are starting to move a little slower now which is normal.

It was a perfect Autumn day with a chill in the air.  The sunny sky was icy blue in color and there was a slight breeze that made me glad I was wearing my sweats.  I decided I would take a walk back into the woods.

Since the dense brush has thinned out a bit it was easier for me to get around back there.  I can't wait to clean them out but boy howdy do I have a project ahead of me!


There is so much smilax in the under brush it's still impossible to get through some areas.  Once I start cleaning out all the brush there will be great pains in not disturbing some areas that wildlife inhabit.  This fallen tree will be interesting.  Should I ask Santa for a wood chipper?


I was hoping to see some wildlife.  Birds were the only part of the animal kingdom who were showing themselves that morning.  But birds are good; I like the birds.  Hunting for the right spot for a deer feeder too.


I wanted to find the creek.

 I've seen it from a satellite photo but have never been able to get back in there and see it. 


This is the first part of the creek that I ran upon.  The creek runs from the west, dives south then turns back to the east.  At this curve in the creek I'm standing atop a drop-off that's about 12 feet, then as it runs east again you can actually walk across it; so I'm told.   I'm facing west looking toward our neighbor's property.  I'm standing right on the edge where the creek turns south and this curve is actually our property line.


 The southern route of the creek is actually on the neighbor's land, but boy do we have a great view of it!  Hmmmm, looks like it's in need of a little algae control.

 At the top of this photo you can see the creek starting to turn the corner and move east.  This is where the creek is on our property and  the banks of the creek are not really steep so we can actually walk down into the creek.  I'll be making it back to that part of the creek another day.  Besides, there are more woods on the other side of the creek to discover!

08 December 2010

The Chimney & the Wall

I am constantly amazed by craftsmen.  I put masonry workers in that category.  Especially those who work with stone.

They turned this pile of rocks

into this.  See how the once grey rocks turned out to have some beautiful colors in them?  They used the sandstone to make the mantle and the top of the hearth.

I get to have some of my favorite moss rock in the house.  The west wall in the great room was originally going to be painted.  BtB and C calculated that there was enough stone to embellish it a bit.

Well, maybe this is a little more than an embellishment.  Have I mentioned that I love rock?

07 December 2010

Progress

Several days before Thanksgiving we drove out to west Texas to spend the holiday with my FIL.  On our way out of town we stopped by the house.

The stone work on the front of the house was complete.

They got started on the wall in the great room.


And finally, it looked like they were getting ready to do the fireplace.  C selected this Colorado river rock.  These all look grey, but when they're cleaned up the stones are different colors.

Laying the stone, tile and wood floors should begin the week after Thanksgiving!

06 December 2010

TV Mirror

We saw one of these really cool bathroom mirrors in a show home one time and thought it the perfect thing for our master bath; especially while I’m getting ready for work in the morning.  When the TV is on, the image shows through the mirror enabling me watch my favorite early morning news program, while at the same time see my reflection in the non-TV area of the glass as I brush my teeth,  apply my make-up and realize just how bad I look that early in the morning.

There are quite a few outfits that have developed these clever systems that combine an LCD television with a specially crafted mirror.   They can cost anywhere between $1,800 and $10,000.  Ouch!!

To keep within our budget, we are creating our own.  We had the architect draw it into the house plans.  An 18” niche was framed into the wall between the master closet and the wall in the master bath where the mirror will be placed.  

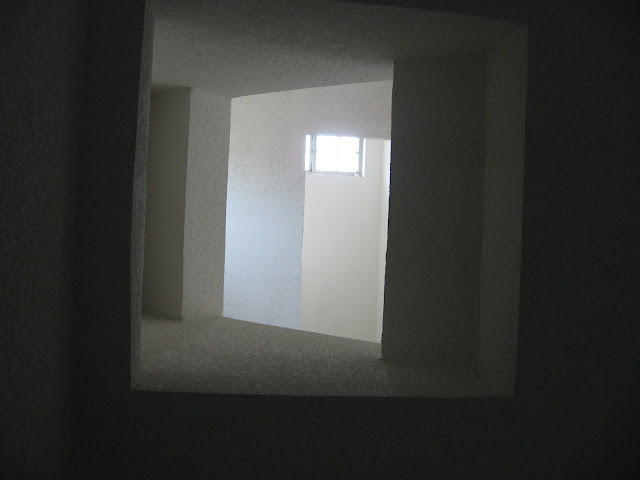
The opening of the niche is in the wall of the master closet; much like you’d create a space for a safe.  This is looking into the closet from the bathroom.

This is looking into the bathroom from the closet.  We'll butt the tv up against that opening.

We’ll use a two-way or see-through mirror. You can see through this type of mirror in either direction, but when looking at the front where the shiny coating is, the reflected light is much brighter than what comes through the back. As a result, you don’t notice what is on the other side of the mirror.  If you watch NCIS you’re familiar with scenes of Gibbs interrogating his suspect in a brightly lit room while Special Agents DiNozzo and McGee are in a dark room looking in from behind the mirrror so that the suspect can't see the light coming in from the back of the mirror.

The niche will be painted black and the TV placed flush against the mirror.  The remote control will work through the mirror and the sound will come through the wall just fine (or so we are told).

I love the DIY Network.